From some times now, we have C compilers for 68K modified to output Genesis rom.
I was always looking for a good IDE.
I know Stef's using Code::Blocks but ...I just don't like it myself.
Since I use Eclipse at work, I tried to use it at home too!
Here is how to do it.
Don't forget, you'll have to test yourself which one between Eclipse and Code::Blocks suits your need!
For Eclipse, just browse official Eclipse CDT download page
So, select the last release (CDT 7.0.1 for Eclipse Helios at time of writing) then your system (32 or 64bits)
You now have 2 Zip files : GenDevKit04 and eclipse-cpp-XXXXX.zip
Create a directory for Genesis development only, WITHOUT space or special chars (got some problems with them so...avoid!)
Unzip your 2 files there, rename GenDevKit one as "sdk" and create a directory called "projects".
You're now ready!
Setup
Open eclipse
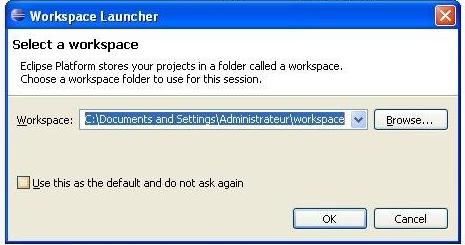
Browse to your "projects" folder and don't forget to check the "Use this as the default and do not ask again"
The workspace is where every project created on Eclipse will be physically created / saved.
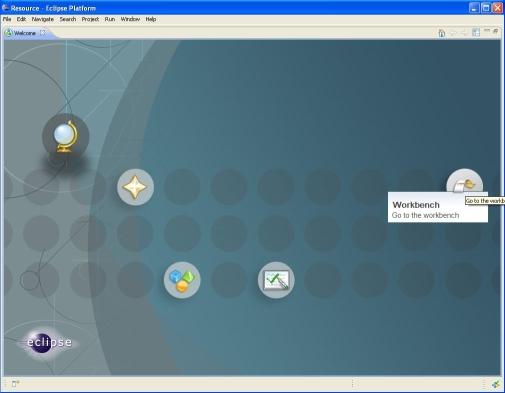
The first time I launched Eclipse, I was totally lost when I saw this screen :
Don't panic ! You just need to click the "Workbench" button.
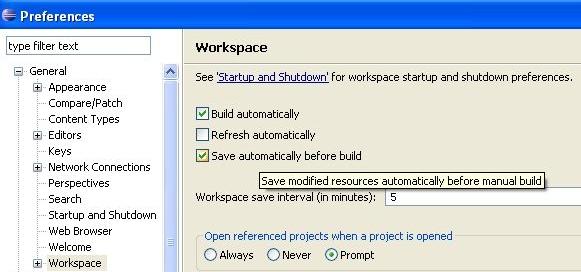
There, select Windows>Preferences...
First, select General>Workspace and click this damn 'Save automatically before build' checkbox
Optionnaly, you could uncheck the 'Build automatically' if you have a low powered PC (or use Vista)
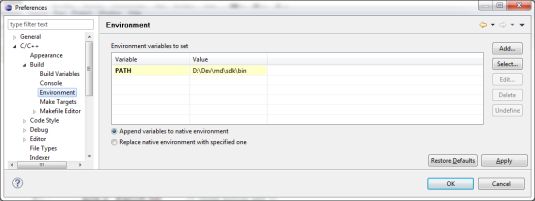
In C/C++ > Build > Environment, add your SDK\bin path
Be sure "Append variables to native environnement" is selected
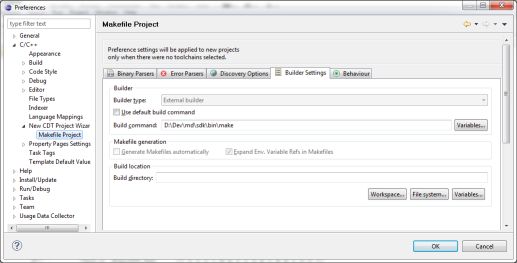
In C/C++ > New CDT Project Wizard > Makefile Project, select tab Builder Settings
Uncheck "Use default build command" and add full path to your make.exe (SDK\bin\make)
That's all, your workspace is now correctly installed !
►Part 2 : First demo
Stef's partic
Stef's GenDevKit comes with a demo called "partic".
Follow these steps to compile it under Eclipse
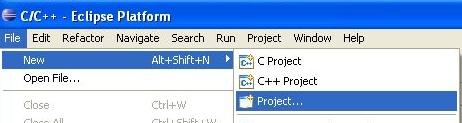
First we need to create a project called "partic" with File>New>Project...
Create a "General" project
Call it "partic"
You could see "Use default location" is check and where your project "partic" will be save (for me e:/megadrive/projects/partic"
You must now add your source files.
Right click on your project and select "Import..."
Select General>File system...
Browse to your sdk\sample\partic folder
Select all the files and add them
makefile is missing because GenDevKit use a generic one : makefile.gen, located on the SDK\bin folder
You must add it following the same previous steps (Import...)
Rename makefile.gen as makefile (Right Click - Rename)
Update makefile
The makefile included in Stef's GenDevKit is perfect for classic use.
But I updated it to be more flexible.
It's very easy, I really dislike hard coded path so I used a variable to store GenDevKit path!
This way, you could use this makefile in any project without changes (unless optional specific compilation behavior)
Here it comes :
#use only / and \ on path
GDK= D:/dev/megadrive/sdk/
CC= $(GDK)bin/gcc
OBJC= $(GDK)bin/objcopy
ASMZ80= $(GDK)bin/asmz80
BINTOC= $(GDK)bin/bintoc
if you have *** multiple target patterns. Stop. error, be sure to use tab and not spaces in line like
<TAB>$(CC) $(FLAGS) -c $< -o $@
Compile
I choose Eclipse CDT because, in fact, it handles makefile project.
So, all the power is only in this makefile, Eclipse CDT doesn't really care about compiler user or target system
à!
But for that, we must have a "Makefile project"
At this time we have a "General project" so....
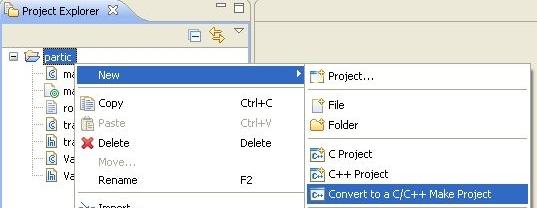
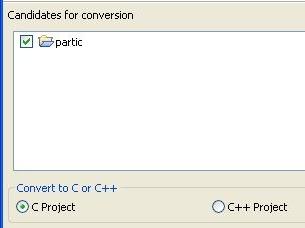
Right click on project, New>Convert to a C/C++ Make Project
We came from C language so be sure to select it
Optional: Eclipse could ask you to switch to C/C++ perspective, answer yes since we need a view from this perspective
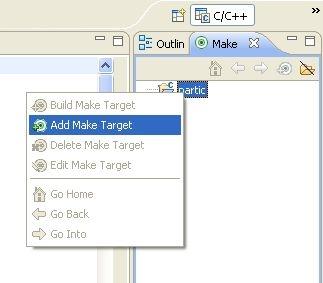
You know have a "Make" view (it must be full right ), right click on 'partic' to add a target
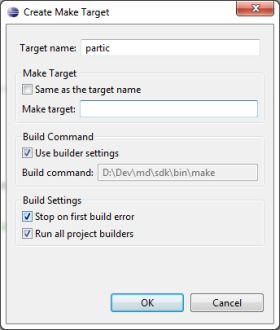
You can now add your "Make" target
Some info for future use Target name is the name shown on the Make view Make Target is the target (!) asked to make like 'all','clean', 'debug'....leave it blank by default or use 'all'
Build comand is the command to call
So, if you want, you'll be easily able to call something like
make -f mymakefile
make clean
Note: if you followed the setup, it SHOULD be SDK\bin\make. If not, Right click on project > Properties, adjust C/C++ Build > Builder settings > Build command and retry
Right click on the 'partic' target you just created and select 'Build target'
(optional if you checked 'Build automatically')
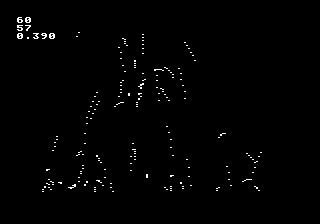
This will generate a rom.out then rom.bin file, as specified in the makefile
et voilà!
Now, if you want, you can make some change to partic code.
All you need to do is right click on partic Make target and...Build target!
►Part 3 : Debugging
As you should know, Gens KMod lacks some features like trace and breakpoint to be a 'real' debugger.
It's why I added 2 ways to inspect your value : debug register and watchers.
The debug register is a fake register I added to let you talk from your code to Gens KMod console.
The watchers let you 'watch' memory addresses.
If the debug register is easy to use, the watcher is only usable for hacking an existing game...since your code-defined variable addresses change each time you compile.
You so have to find each of your variable addresses and enter each one in watchers list....very boring!
While talking with Fonzie about a way to do this, he pointed me to map.exe and nm.exe utils. nm2wch is born some hours later.
This little tool is very useful : it creates the watcher list for you !
First, you'll 7-zip to unzip the bin.tar.lzma files
I use nm.exe from MinGW's GNU-Binutils package, since it's not included in GenDevKit.
Then nm2wch for my website.
Copy these two tools in sdk\bin and modify your makefile
These lines
- create a textfile describing your variables (rom.nm)
- convert this formatted textfile to a GensKMod watcher file
Unfortunatly, we have a problem : nm can't output directly to a textfile, it's why I use >rom.nm
But this command will produce an error if you try to build your makefile make: /bin/sh: Command not found
What is /bin/sh ?!! sh.exe is the default shell make is looking for.
It was quite difficult to find a working sh...
- MinGW owns a sh.exe in its bash package (aslo need msys-regexxx.dll from regex package and msys-termcap-x.dll from termcap package) but I'm no longer able to use make
-
sh port for Tools for Windows Unicon doesn't work also
- win-bash breaks make
- Steve's GNU Bash bugs eclipse
- AT&T open source port ask for permission (?!)
I finally found an old one still working on my Windows 7 64bits at UnxUtils
Copy its sh.exe into SDK/bin and update your makefile to use this shell
SHELL = $(GDK)bin/sh
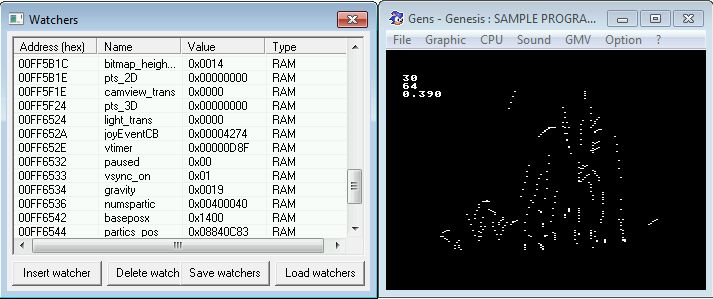
Ok now, if your makefile successfully produce a rom.bin and its linked rom.wch, launch Gens Kmod 0.7b+
Be sure "Auto load watchers & structures" is selected in Options>Debug...
Open your rom and open the watchers window : all your variables are here, you can now easily follow their values while playing !
►Part 4 : Setup additional tools
Maccer
Maccer is a tool I can't live without !
I often produce my gfx or sound files with my own tools, so I use Maccer to include them.
It's a kind of replacement for 'bintoc', included in GenDevKit.
I made my own version of Maccer to support every Genesis C compilers.
For more info and to download it, see MaccerX page
UCON64
I use UCON64 to fix the checksum, pad the rom and convert it to a SMD file.
If you have a backup device, you also could send the produced rom directly to your backup device!
It enhances objcopy's padding feature, included in GenDevKit, and add CRC auto check, SMD convertion and upload to several backup systems or Flash cards.
Just download and unzip it to our SDK\bin folder and modify the makefile to use it
GenRes is my last gift to the genny dev scene.
If you already made some Windows development, you should be familiar with WinRes. GenRes is similar.
Throught a resource file, you can define resource to be used in your game.
Include bitmap, sound and much more WITHOUT additional tools.
You no longer need b2t or mmm, they are now available throught GenRes.
And if you want to add support to your own resource, just write the plugin needed !
Oh, and since a lot of you use Pascal's genitile, I wrote a plugin to access genitile features from GenRes.
For more info and to download it, see GenRes page.